
Spyre
At a PyData Meetup last week, some fellow classmates and I were introduced to Spyre, a framework for creating data-driven python web apps. It’s the simplest way I’ve found to launch a dynamic web app and not touch HTML or javascript… some days just aren’t HTML&javascript days, y’know?
Start here
I’ve been playing around with Spyre for a week now. Here are the basic steps to make an app happen:
1) First, know some python (or copy my code blindly).
2) Install Spyre:
$ pip install dataspyre
3) Open a script file in your favorite editor. The file name doesn’t matter. Let’s call it apptlynamed.py.
4) Each Spyre file needs five basic things to get running:
Import the module
from spyre import server
Create the App class
class SpyreApp(server.App): #inherits the server.App class
Inside your class, define your inputs dictionary
    inputs = 	 [{ "type":"text", #specify input format. this is a textbox
                  "key":"words", #'words' is the key we will use to refer to value, below
		  "label":"write words here", #label for the textbox (optional)
                  "value":"hello world", #initial value
                 	  "action_id":"update_data"}] #tells Spyre what to do when value is entered
Inside your class, define your outputs dictionary
     outputs = 	 [{"type":"html", #tells Spyre to use getHTML file to generate output
                 "id":"update_data"}] #needs unique id
Launch
if __name__ == '__main__':
     app = SimpleApp()
     app.launch(port=8000) #or the port of your choice
5) Copy and paste those five blocks, in order, into your script file.
6) On the command line (in the app’s directory), type
$ python apptlynamed.py
7) Open your browser and go to localhost:8000. App’s up!
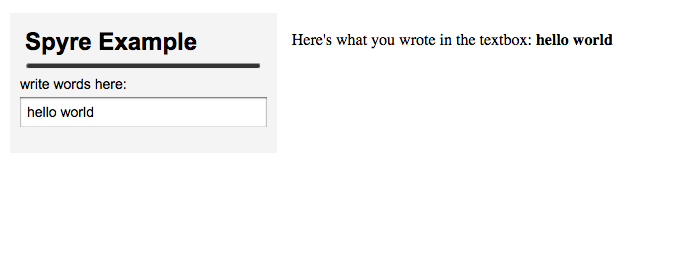
Notice that Spyre outputs the following text:
“Override the getHTML method to insert your own HTML here”
Let’s do that. Inside the SpyreApp class, underneath your outputs, copy the following:
	def getHTML(self, params): #argument params allows you to access inputs
            words = params["words"] #params is a dictionary. grab value entered in textbox with the key 'words'
            return "Here's what you wrote in the textbox: <b>%s</b>" % words #return a string
And, add a title above your inputs:
title = "Spyre Example"
Basic app, done.
More outputs
Spyre works with pandas dataframes to create tables, and matplotlib to plot data from those tables. You know those packages and you’ve mastered them (along with the art of stack-overlowing those damn axes formatters), so, relief.
When we introduce more outputs, we’ll introduce more variables and modify our outputs variable. We’ll need tabs to separate the outputs, as well as a controls variable to control the output flow depending on which tab we’re on. Also, in our outputs variable, we’ll need to add a control_id attribute. Check out some sample code:
tabs = ["Plot","Table"] #names should not have spaces here

controls = [{"control_type" : "hidden",
	   "control_id" : "update_data"}] #name of control_id doesn't matter, as long it matches the outputs

outputs = [{"output_type" : "plot", #tells Spyre to use getData file to generate output
	  "output_id" : "plot",
	  "control_id" : "update_data", #matches 'controls' control_id above
	  "tab" : "Plot"}, #match our tab name
	  {"output_type" : "table", #tells Spyre to use getPlot file to generate output
	  "control_id" : "submit_plot",
	  "output_id" : "update_data", #matches 'controls' control_id above
	  "tab" : "Table"] #match our tab name
Then, just like we overrode the “getHTML” method earlier, we’ll override “getPlot” for plot output and “getData” for table output. They’ll need to return a matplotlib figure and a pandas dataframe, respectively.
Spyre’s creator Adam Hajari has a number of illustrative examples on his github. I suggest reading through his tutorials, as well as running his code and playing around with the options.
I recently deployed a Twitter Sentiment Analysis app, using Adam’s guide to deploying Spyre on Heroku.
Get inspyred!